Topic: How To Create a Digital Parts Catalog
Author: OEMDocs
Created: 04/28/2023 02:09:54 UTC
Last Update: 10/01/2024 21:04:15 UTC
Steps to Create a Digital Parts Catalog
Step 1
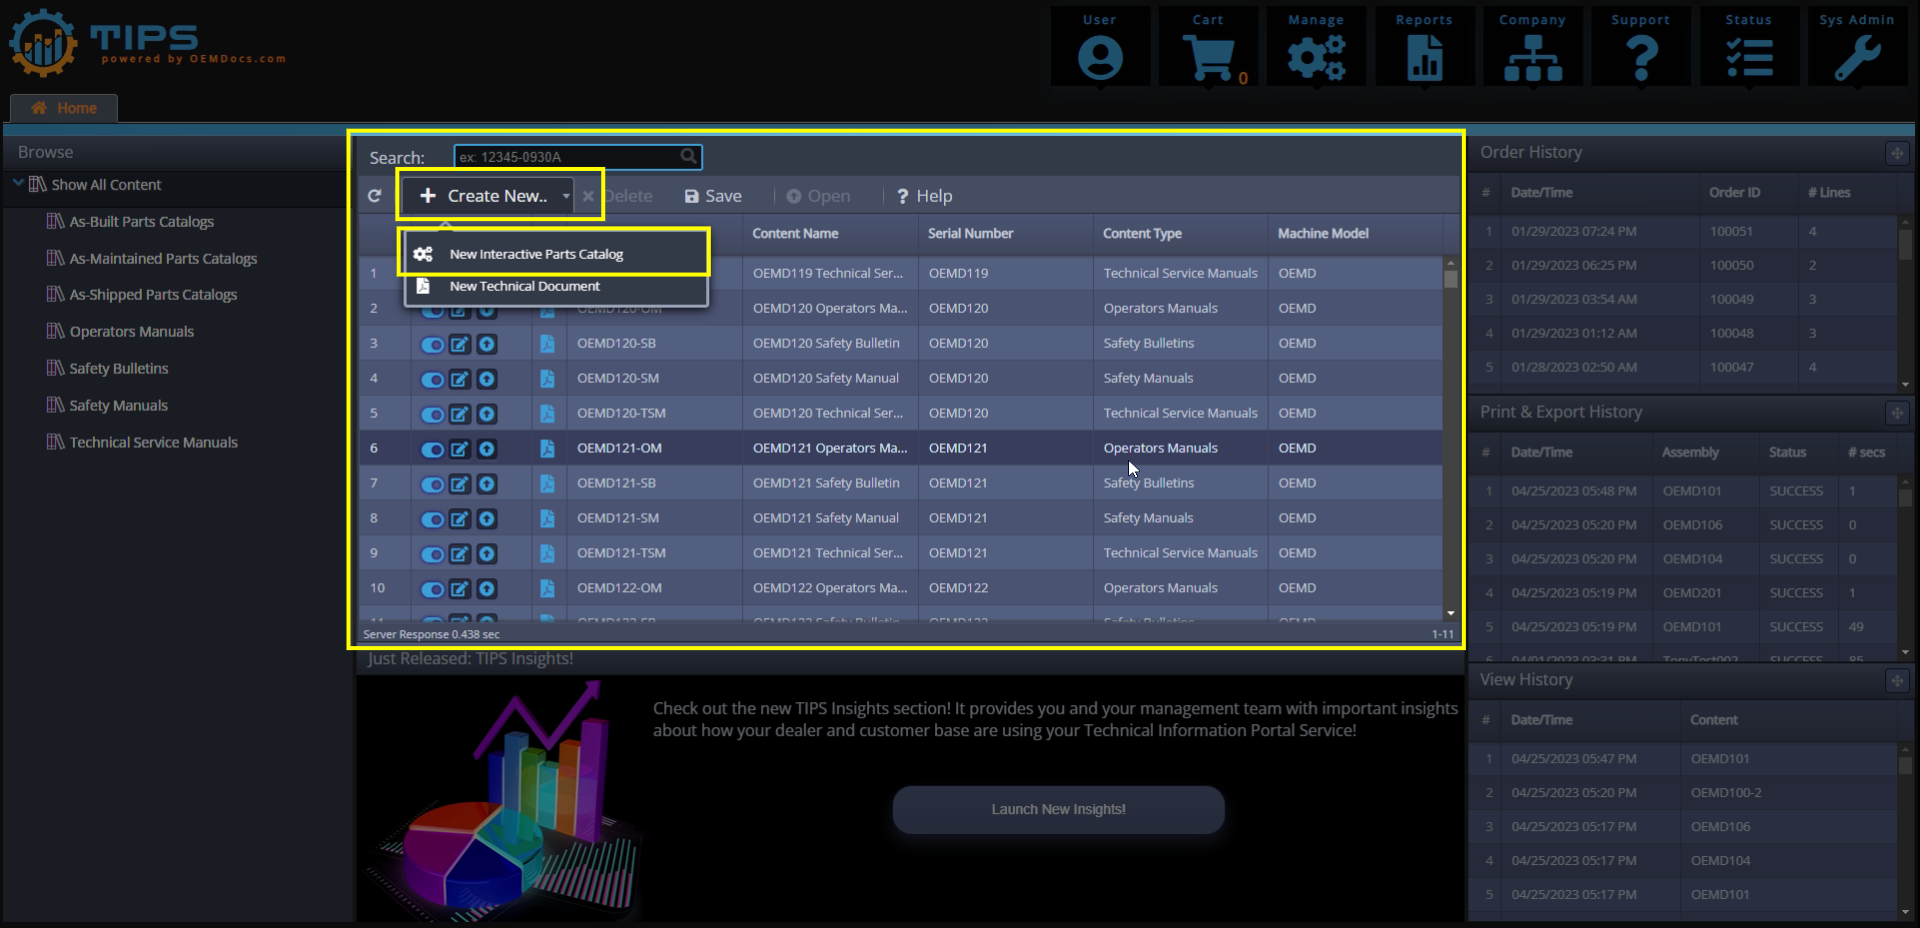
When you're logged into the TIPS application and on the home tab, click the Create New.. button on the toolbar of the middle content panel.
[click img to enlarge]
Then click New Interactive Parts Catalog
Step 2
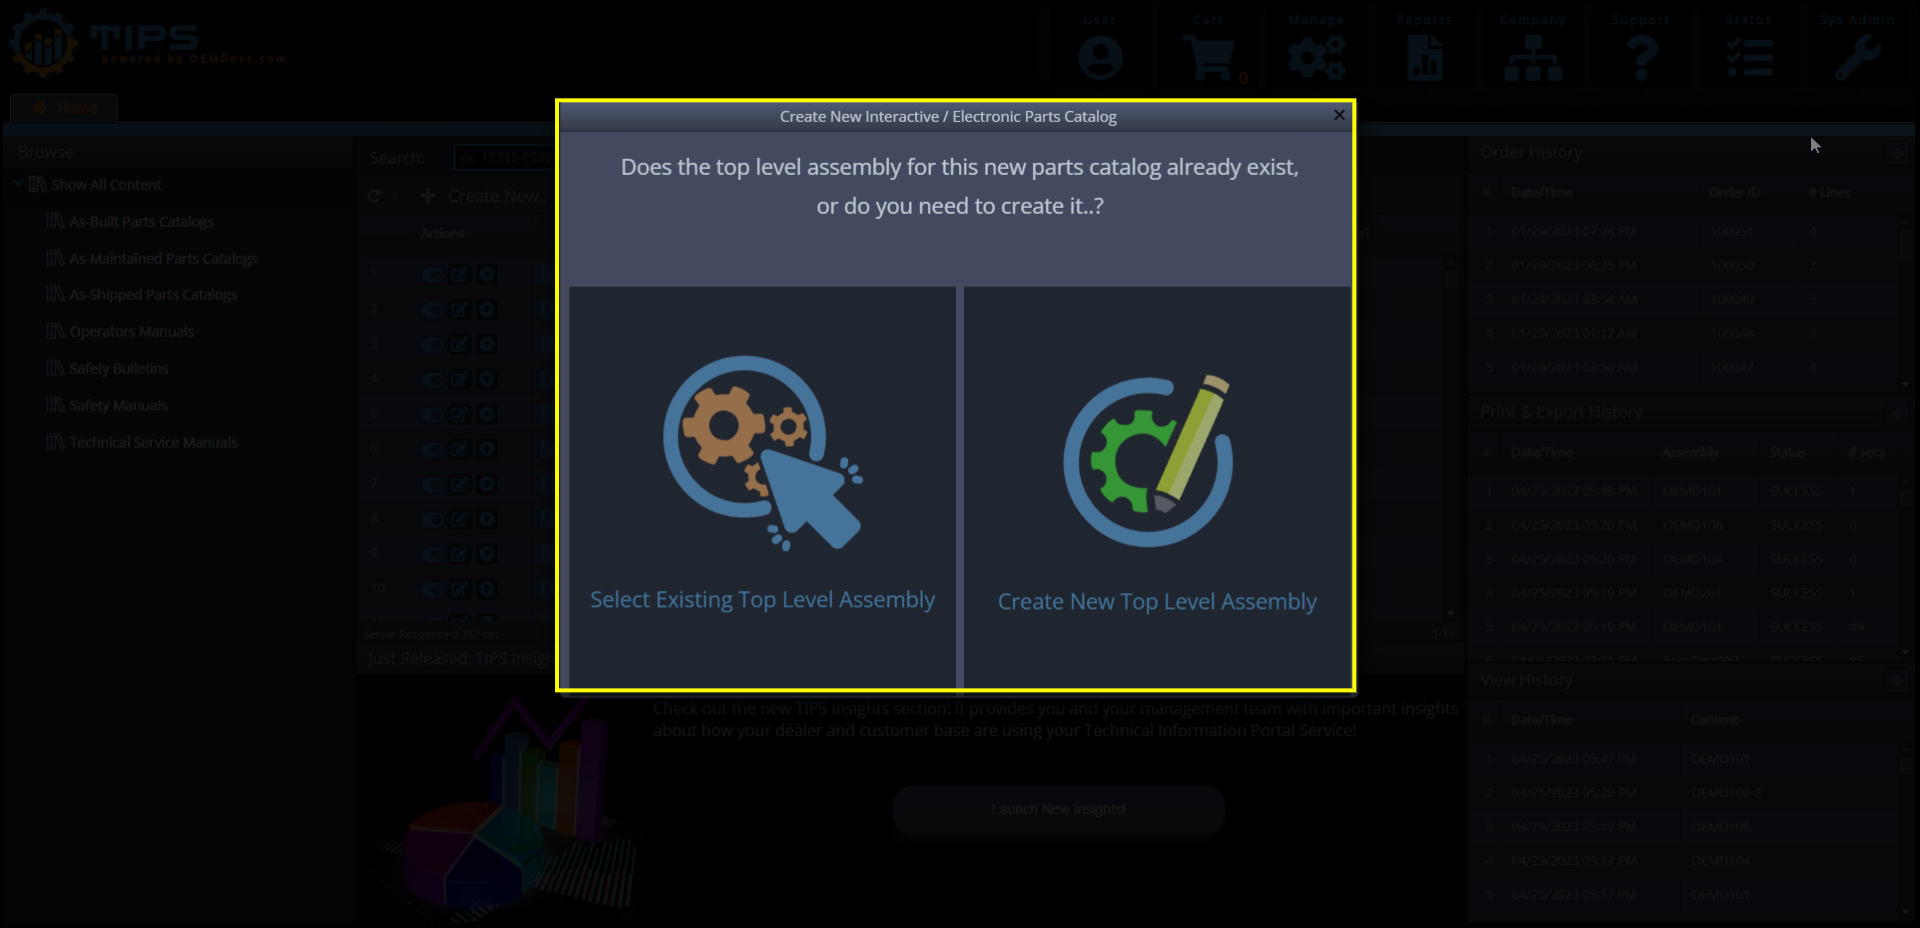
After Step 1, the "Create New Interactive / Electronic Parts Catalog" wizard will open.
You will have two choices to proceed:
(a) Select Existing Top Level Assembly
(b) Create New Top Level Assembly
If you choose Option (a), selecting an existing top level assembly, continue on to Step 2a below.
If you choose Option (b), creating a new top level assembly, continue on to Step 2b below.
[click img to enlarge]
Step 2a Option
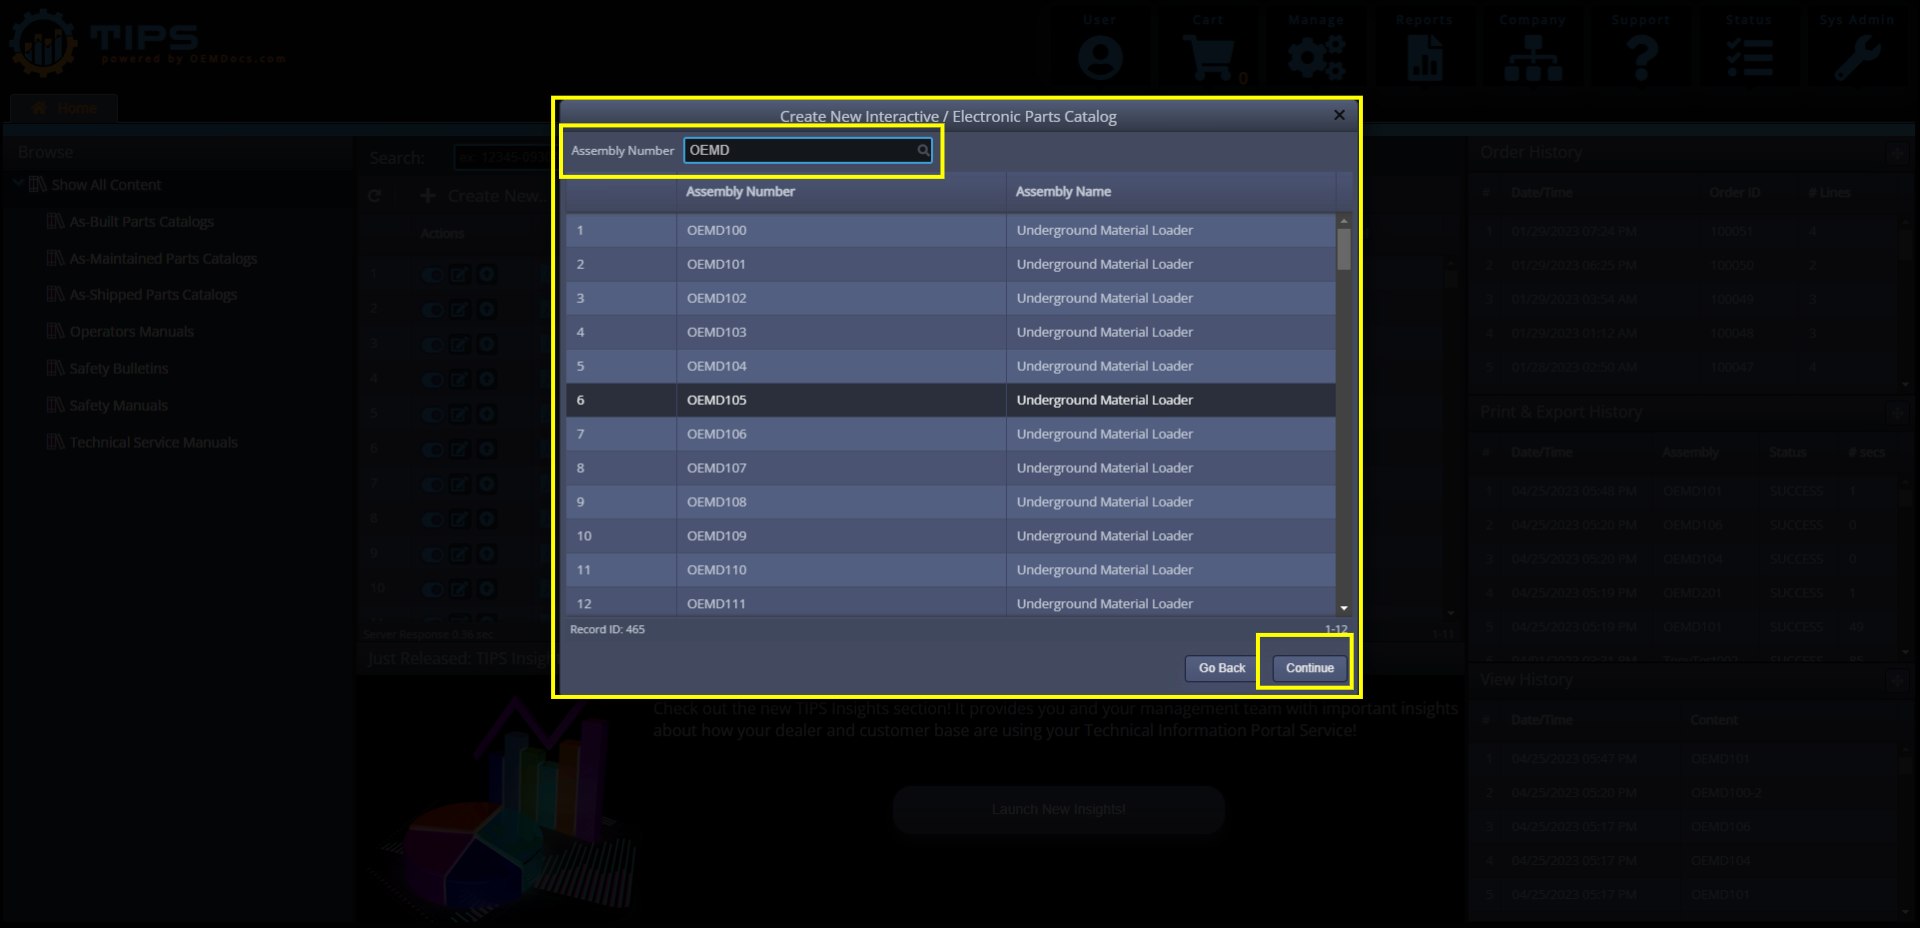
On the following screen, you'll be able to browse through the list of all assemblies that exist on the system, or alternatively, you can use the convenient Assembly Number Search functionality to search for the assembly that you would like to be the Top Level for your new Interactive Parts Catalog.
Pro Tip! All search fields on the TIPS system allow wildcards (*) for leading/trailing search patterns, as well as double quotes (") for exact match searches.
Click the row within the Assemblies Grid to choose the Assembly to be your Top Level.
[click img to enlarge]
Then click Continue
Step 2b Option
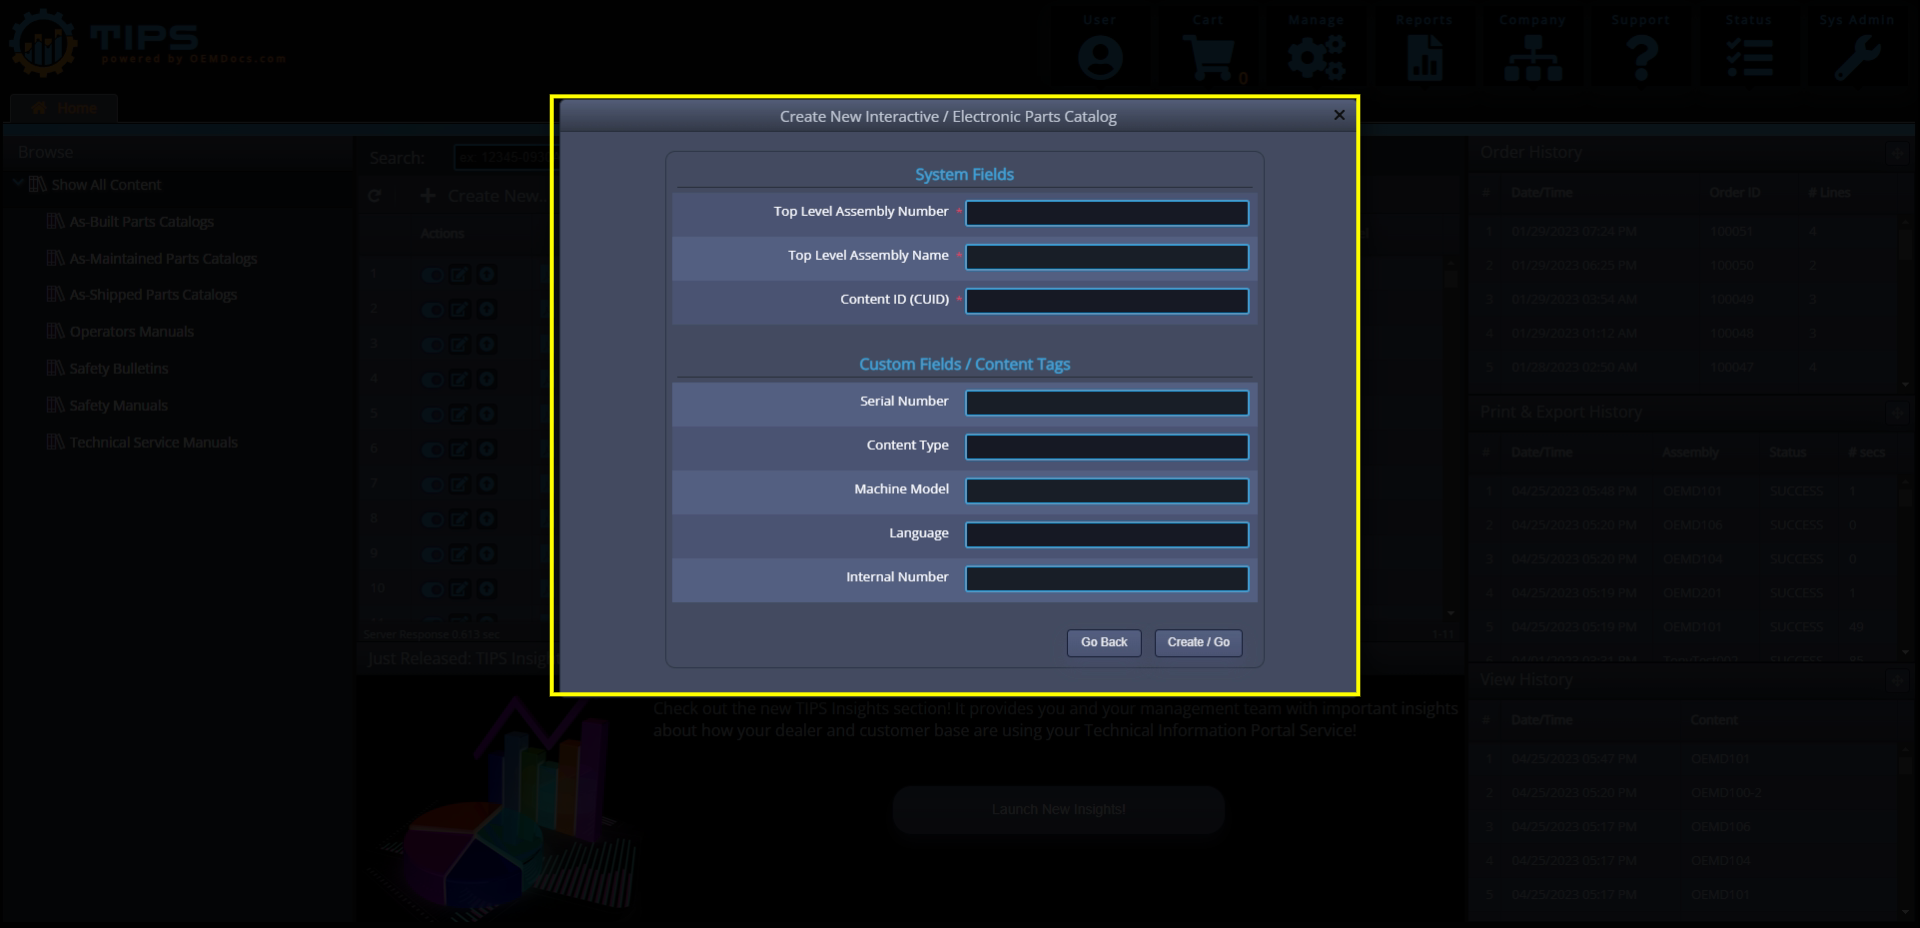
On the following screen, you'll see a form with fields. The first three fields are system fields which are required, and on the bottom, there are custom fields / content tags (our Admin Documentation has more information on how to add, remove, update or delete these custom fields).
Enter the Top Level Assembly Number
Pro Tip! Use the Tab Key to quickly toggle to the next field!
Enter the Top Level Assembly Name. This will also become the Name for this new parts catalog.
Enter a unique Content ID CUID. Publishers/Authors might generally use the serial number of the machine with a suffix, such as "198273-AM" for a machine with serial number 198273 and when creating an "As-Maintained" version of the Parts Catalog. This is just an example / good practice, you may enter any unique value that suits your needs.
Then (optionally) fill out the custom field values at the bottom of the form.
[click img to enlarge]
Then click Create / Go
Step 3
On the following Parts Catalog Builder screen, you'll now see your new (empty) parts catalog, and you're ready to start creating the content within the catalog. But first, let's learn the layout:
The left side panel contains the Table of Contents (TOC), as well as a toolbar containing features to help you build out the catalog.
The middle panel contains a drag and drop area for you to publish an image of this machine.
The right side panel contains the Bill of Material (BOM), sometimes called the Parts List, with various methods for creating the BOM (including drag and drop).
Here in Step 3, we will be publishing the Drawing for this machine.
Simply drag and drop an image of this machine onto the Middle Panel. Your image will be different, but the screen should look similar to the following:
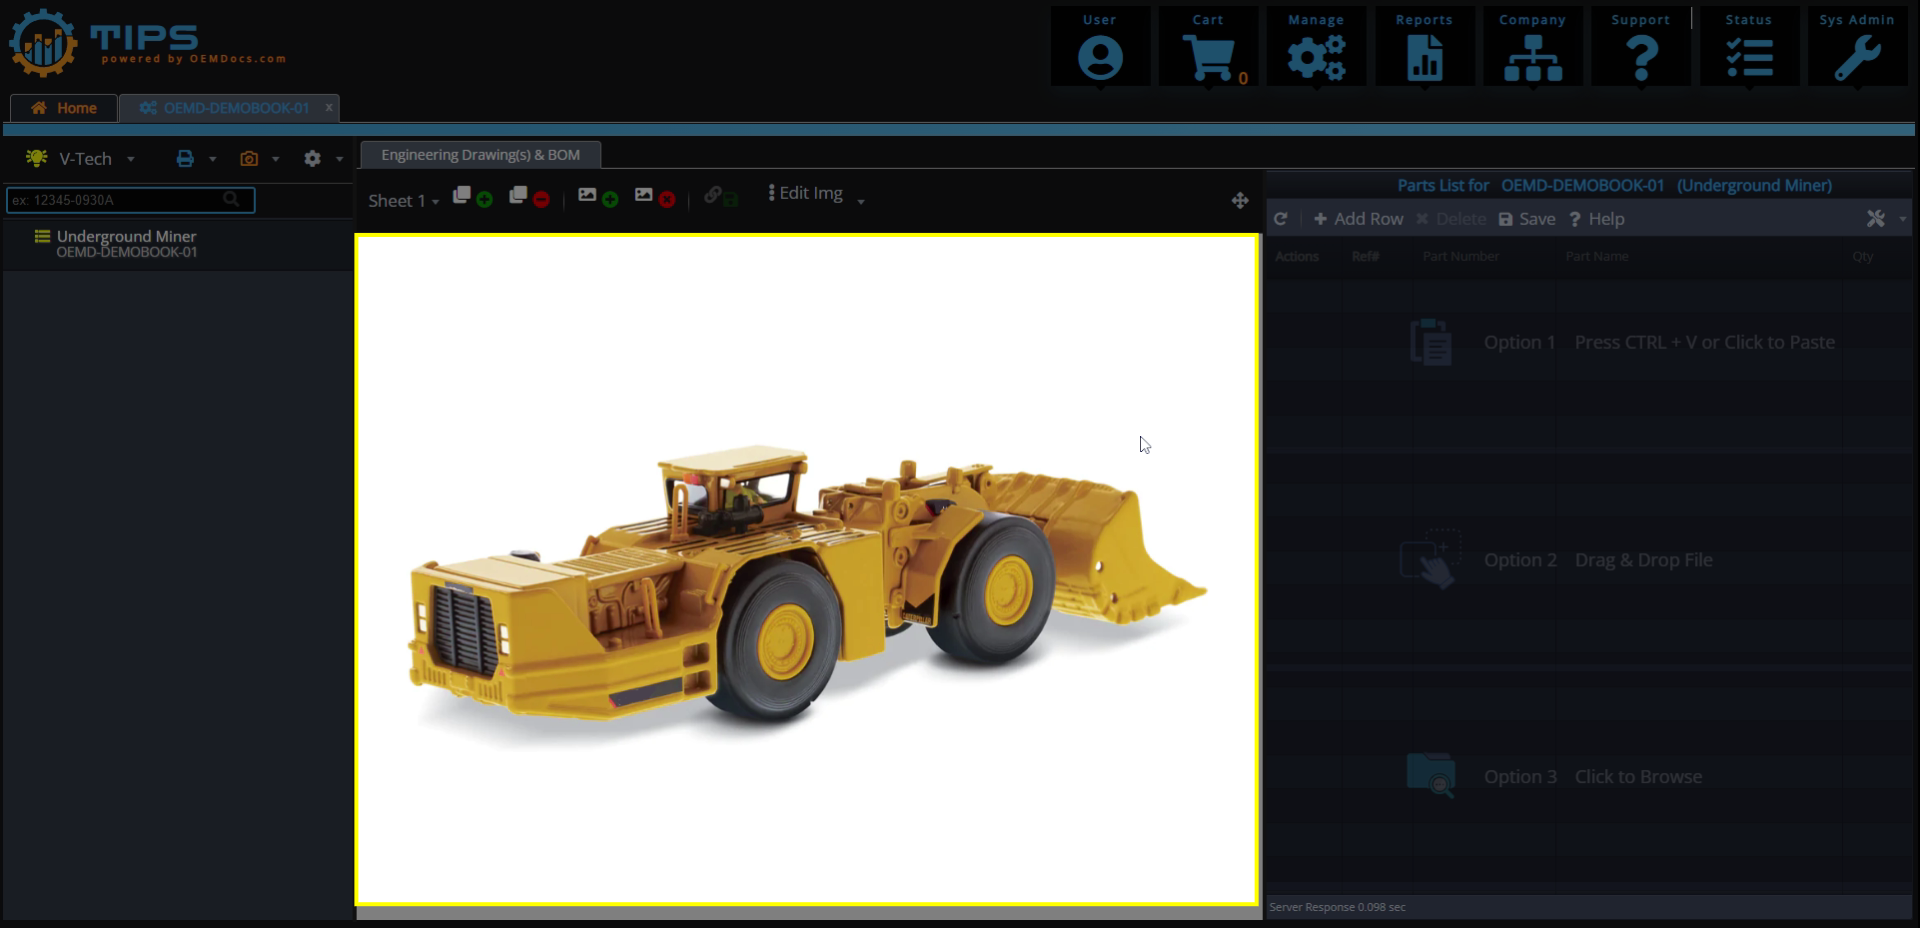
[click img to enlarge]
Step 4
Next, simply drag and drop the Bill of Material / Parts List file onto the middle section of the Right-Side Panel.
This will launch the Import BOM Rows: Preview Popup.
Pro Tip! TIPS will automatically calculate import settings, such as what your data's delimiter is, field enclosures, and new line method. However - you can manually specify the import settings at the top left of the import window!
TIPS assumes the order of the columns will be: Ref #, Part Number, Part Name, Quantity.
If your column order is different, simply drag and drop the column titles/headers to assign each column its correct title.
Then click the Import Parts List button.
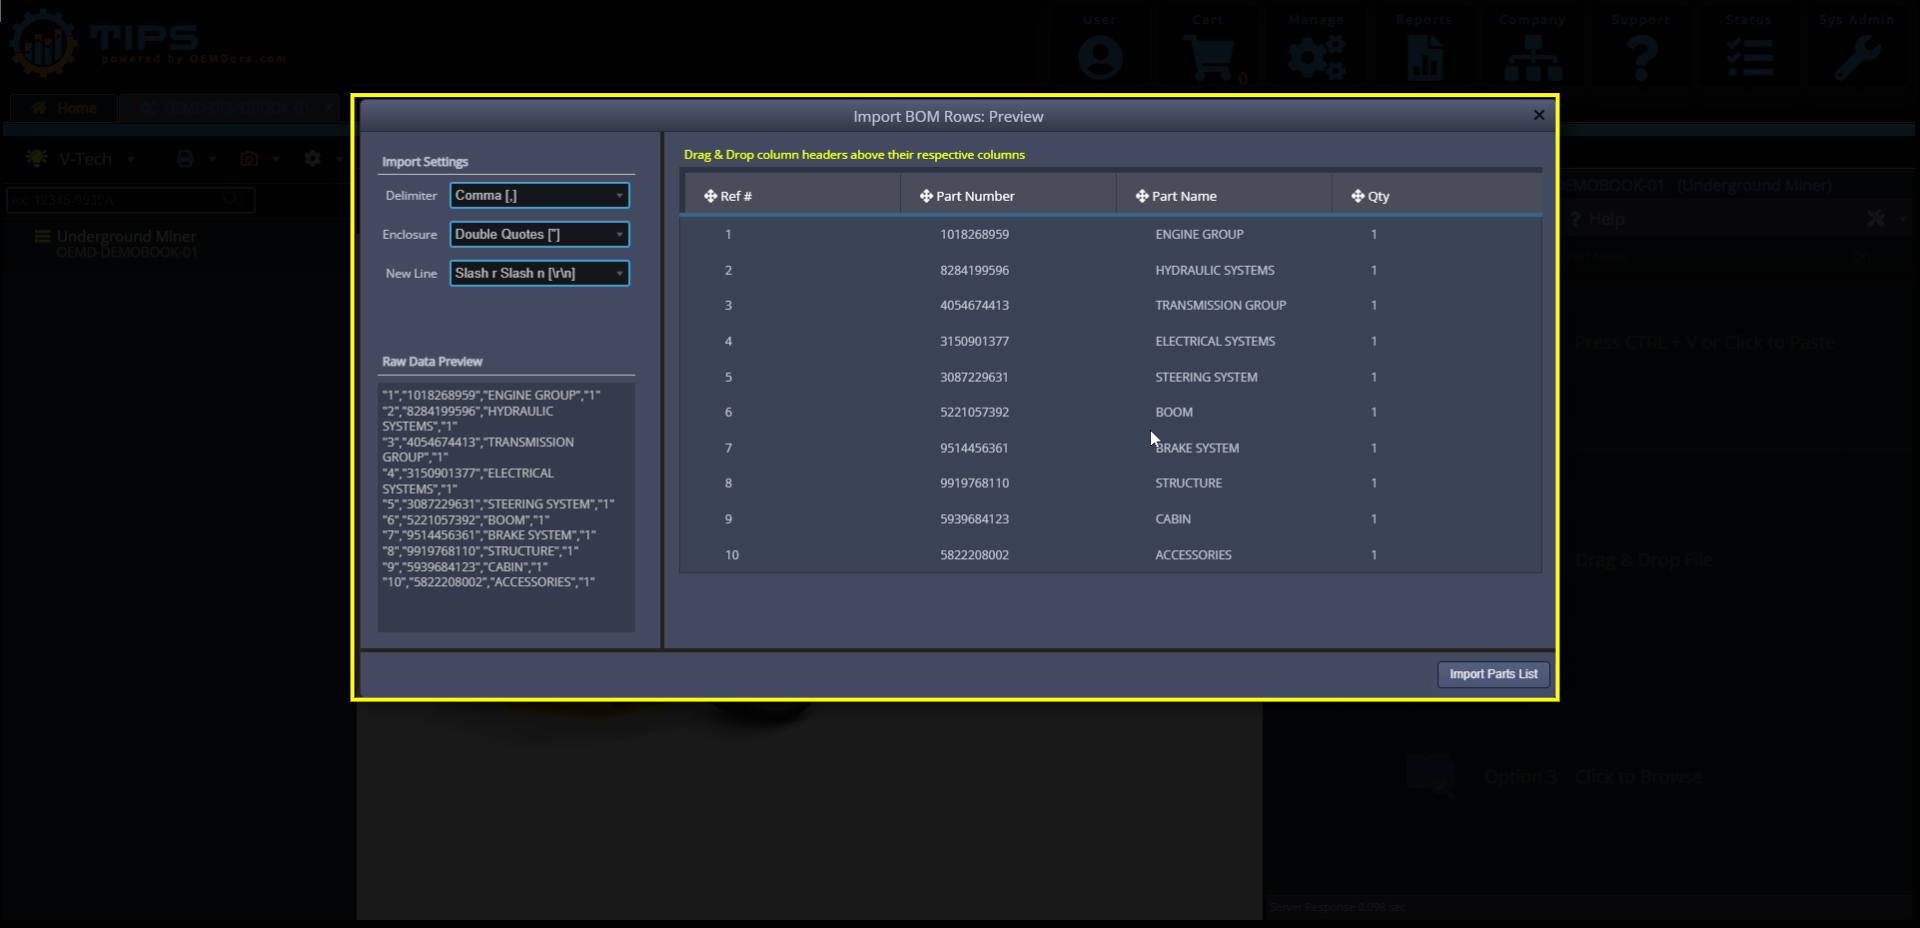
[click img to enlarge]
Step 5
You should now have both the machine image and its top level parts list complete. Congratulations - you've built your first assembly within TIPS!
Now - here is where the magic happens.
We are now going to use the V-Tech Smart Assistant, which will help to automate and ensure precision in the remaining parts catalog building process!
Simply click the V-Tech drop down on the left side panel's toolbar, then click V-Tech Smart Assistant
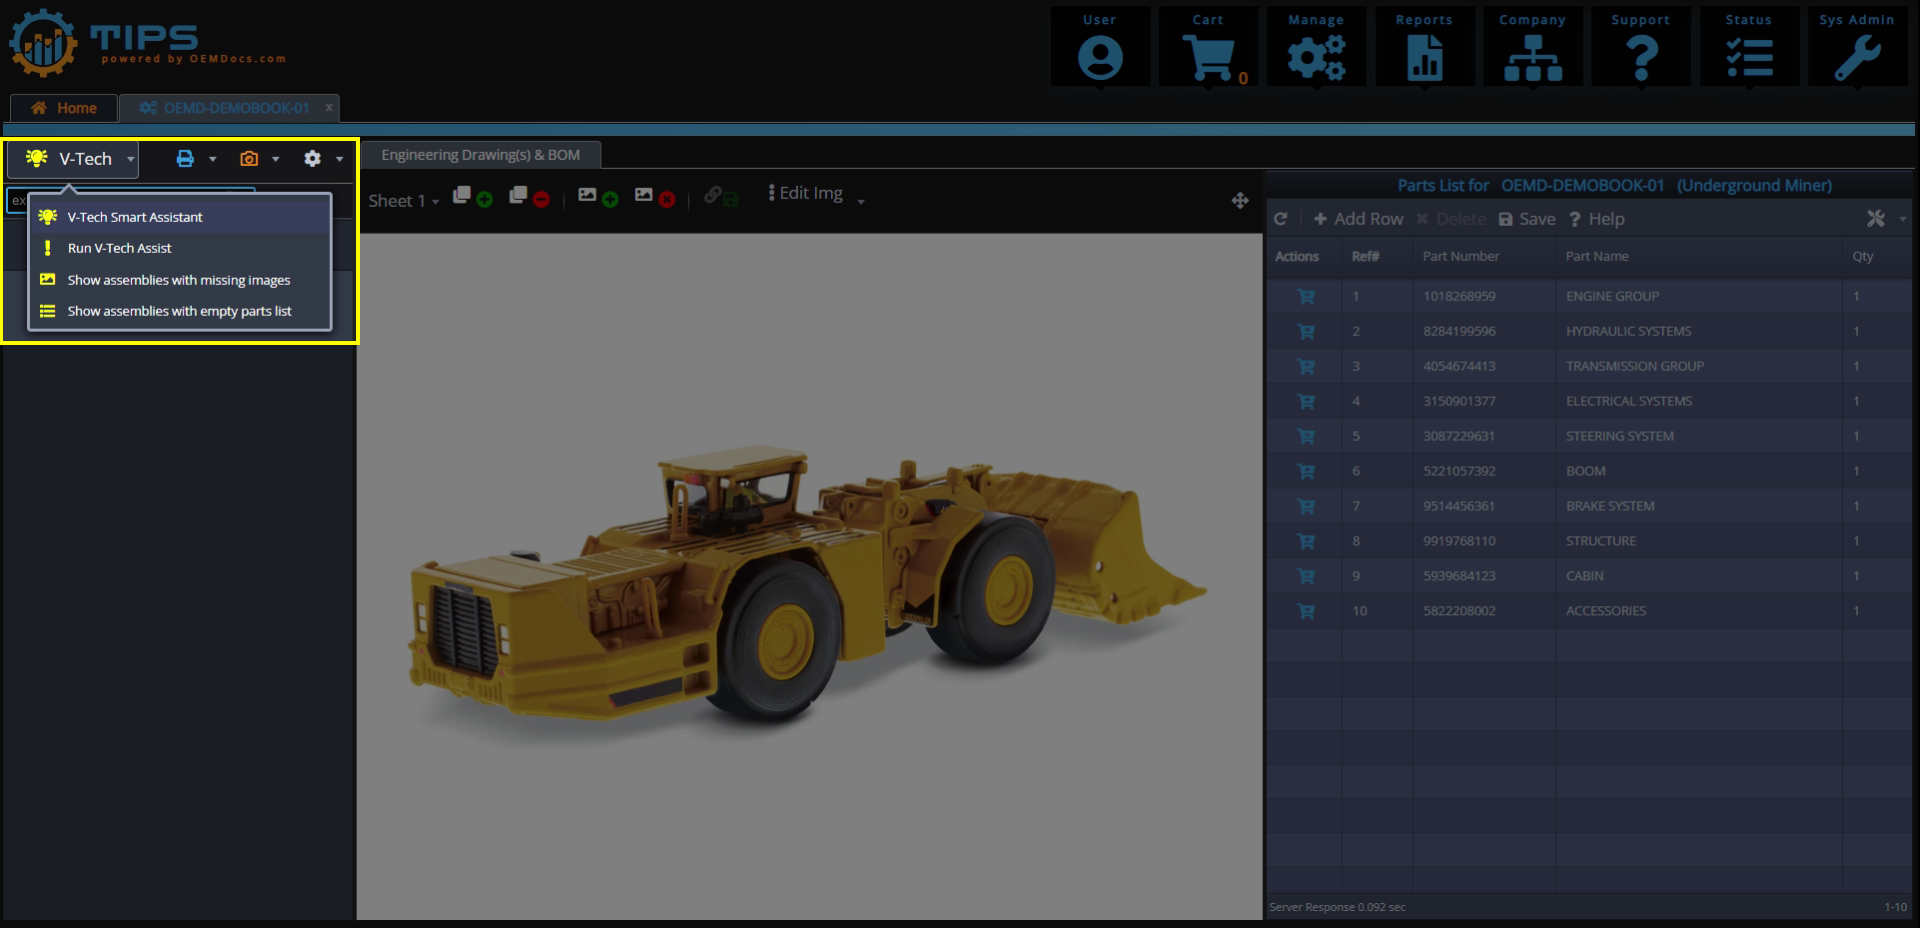
[click img to enlarge]
Follow the simple instructions provided in the Wizard / Popup!
Step 6
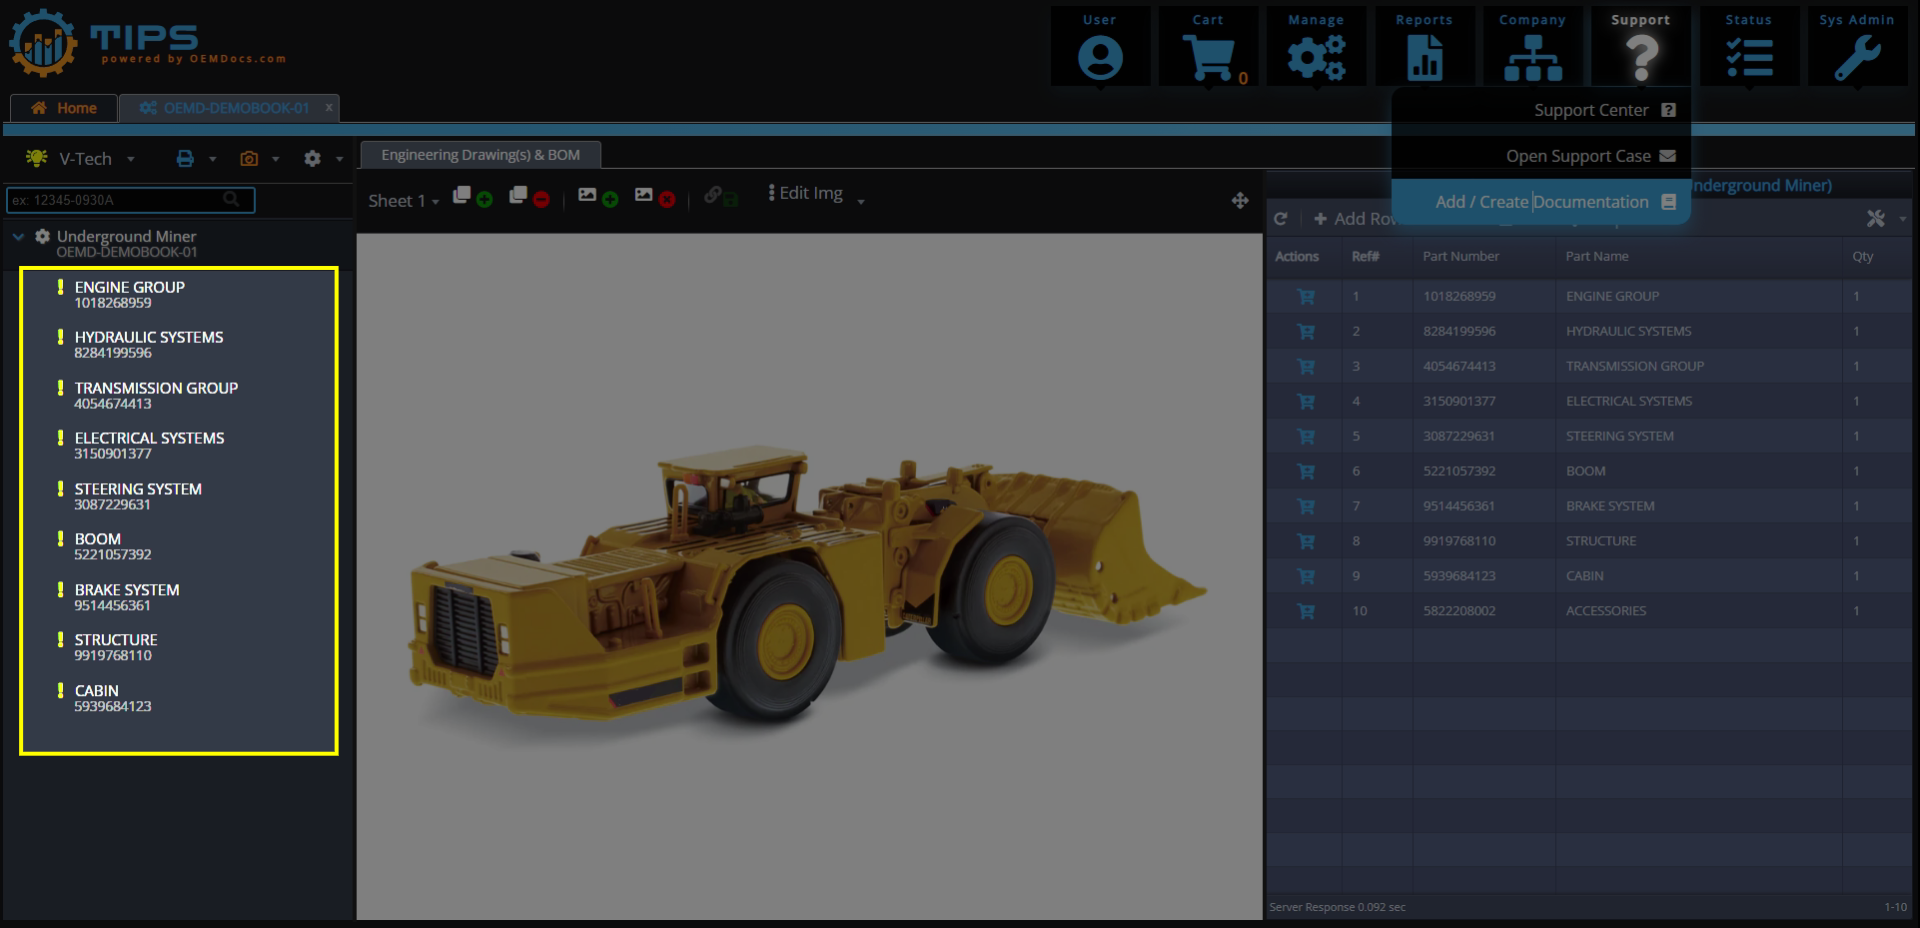
This is the 6th and final step. By using the V-Tech Smart Assistant in Step 5, TIPS has now calculated precisely which structures and groups need to be created.
This means there is no guesswork about what the next assemblies we need to create are - the TIPS system guides you!
Simply click on any TOC item on the left-side panel which contains an (!) icon - indicating this assembly/structure needs to be created, and the system will auto-create it for you!
You can then drag and drop the engineering diagram to the middle panel, and the parts list to the right-side panel, just like you did in Steps 3 and 4!
Repeat the process for each assembly, and you'll have the entire parts catalog created literally within minutes!
[click img to enlarge]
It's that simple!
If you have any questions, or need any assistance, we would be honored to help you. Just pick up the phone and call us, or use our contact page to email us!